
The Ultimate Painting Method Statement for Construction (QA/QC & SWMS Guide)
A failing paint job is a construction nightmare. When protective coatings peel, blister, or flake off a newly finished substrate, the paint is rarely the root cause. Catastrophic coating failures almost exclusively trace back to rushed surface preparation construction, ignored environmental thresholds, or a fundamental failure to follow approved protocols.
This guide elevates standard finishing practices into a definitive painting method statement construction masterclass. Whether you are a site engineer, a QA/QC inspector, or an HSE officer, following these integrated engineering, safety, and quality assurance protocols ensures a durable finish that passes inspection the first time.
1. Purpose and Scope of the Painting Method Statement
Defining Project Objectives and Aesthetic Standards
What is a painting method statement?
A painting method statement in construction is a formal technical document that outlines the step-by-step procedures, safety protocols, and quality assurance standards required to execute painting works safely. It details surface preparation techniques, environmental constraints, material specifications, and Safe Work Method Statement (SWMS) requirements to prevent defects and ensure structural longevity.
The primary scope is to establish strict application guidelines that deliver both protective sealing against environmental degradation and the exact approved aesthetic finish (RAL color designation).
Navigating Regulatory Compliance (WHS, OSHA, and EPA Lead RRP Rule)
Execution must align with local and international statutory frameworks. This includes Workplace Health and Safety (WHS) Act compliance, OSHA standards for working at heights, and adherence to the EPA Lead Renovation, Repair, and Painting (RRP) Rule when remediating older structures to protect workers from toxic exposure.
2. Integrating International Reference Standards (Expert Section)
Professional painting QA/QC procedures are anchored in global engineering standards.
The SSPC / NACE Surface Preparation Continuum (SP-1 to SP-11)
Surface preparation is not just “cleaning”; it is a standardized engineering process.
-
SSPC-SP1 (Solvent Cleaning): The prerequisite to all other prep. Removes visible oil, grease, and drawing compounds using solvents.
-
SSPC-SP2 (Hand Tool Cleaning) & SSPC-SP3 (Power Tool Cleaning): Used to eradicate loose mill scale, loose rust, and heavy efflorescence without altering the underlying surface profile.
-
SSPC-SP11 (Power Tool Cleaning to Bare Metal): Utilized when a specific surface profile (roughness) is required for heavy-duty industrial coatings to achieve mechanical adhesion.
ISO 12944: Designing for Corrosivity Categories in Structural Steel
For structural steel and exterior elements, the coating system must be selected based on the environment’s ISO 12944 corrosivity category—ranging from C1 (heated interiors) to CX (extreme offshore environments). This standard dictates the required paint chemistry, thickness, and expected lifecycle.
3. Delineation of Roles and Responsibilities
-
Construction Manager & Site Engineer Duties: Directly plan and execute the work. They must secure active permits, ensure MEP (Mechanical, Electrical, and Plumbing) clearance is achieved prior to starting, and direct the workforce.
-
QA/QC Inspector & HSE Officer Oversight: QA/QC monitors the Inspection Test Plan (ITP), verifying material batches and approving surface profiles. HSE enforces Safe Work Practices, conducts Toolbox Talks, and actively manages the SWMS.
4. Developing a Safe Work Method Statement (SWMS) for Painting
Basic painting inherently involves chemical and physical risks. A formalized painting SWMS is legally required to map and mitigate these hazards.
Identifying High-Risk Construction Work (HRCW) in Painting Operations
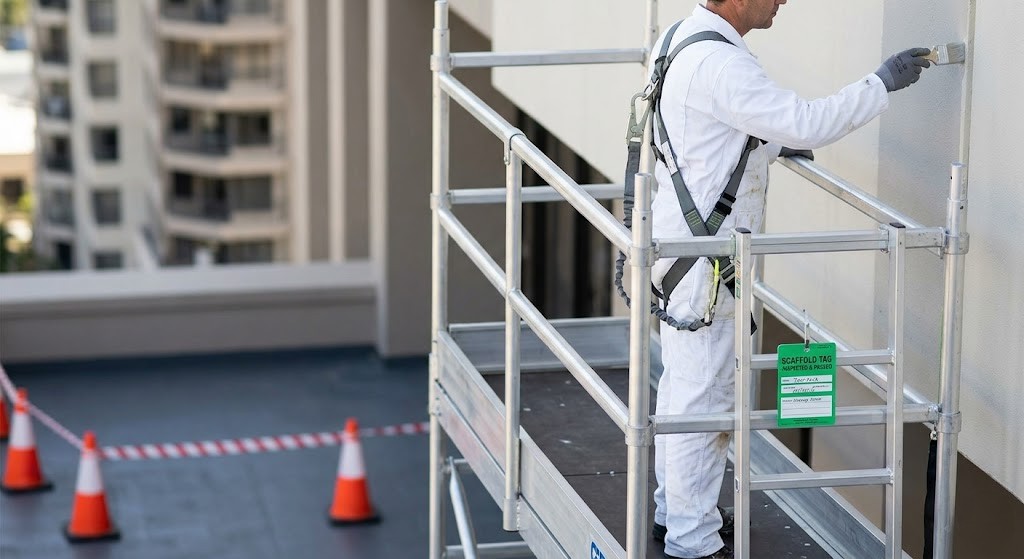
Painting triggers HRCW classifications when it involves working at heights exceeding 2 meters (scaffolding, boom lifts), entering confined spaces (tanks, utility shafts), or disturbing hazardous legacy materials (asbestos or lead paint).
Implementing the Hierarchy of Controls for Painting Hazards
Risks must be managed systematically:
-
Elimination/Substitution: Swapping solvent-based alkyds for low-VOC water-based acrylics where applicable.
-
Engineering Controls: Using industrial extraction fans in enclosed areas.
-
Administrative Controls: Rotating workers to limit chemical exposure times.
-
PPE: Mandating half-face respirators with organic vapor cartridges, not just basic dust masks.
Confined Space Protocols and VOC Exposure Management
Volatile Organic Compounds (VOCs) off-gas rapidly during application. In confined spaces, VOC buildup displaces oxygen and creates an explosive atmosphere. Continuous atmospheric monitoring and robust mechanical ventilation are absolute prerequisites.
5. Administrative Prerequisites and Material Approvals
Securing MEP Clearance and MSDS Management
Never paint a room before MEP teams have finished rough-ins and testing, or rework is guaranteed. Concurrently, Material Safety Data Sheets (MSDS) must be physically present at the mixing station to direct emergency response for chemical splashes or inhalation.
The Mock-Up Sample Approval Workflow
Before full-scale application, a physical mock-up must be completed under actual site conditions. This establishes the unarguable baseline for color accuracy, texture, gloss level, and hiding power, requiring formal sign-off from the lead consultant.
6. Calculating Environmental Constraints and Climate Controls
Standard guides say “don’t paint in the rain.” Expert engineers calculate exact thermodynamic thresholds.
Monitoring Relative Humidity (RH) Thresholds (The <85% Rule)
Application must be suspended if Relative Humidity (RH) exceeds 85%. High moisture prevents water-based paints from coalescing properly and causes solvent-based polyurethanes to “blush” (turn permanently cloudy).
Executing Dew Point Calculations (+3°C Minimum)
The “Dew Point Rule” is non-negotiable. The substrate surface temperature must remain a minimum of 3°C (or 5°F) above the ambient dew point during application and the initial curing phase. Failure to do so causes invisible micro-condensation on the wall, destroying adhesion.
7. Step-by-Step Surface Preparation Protocols
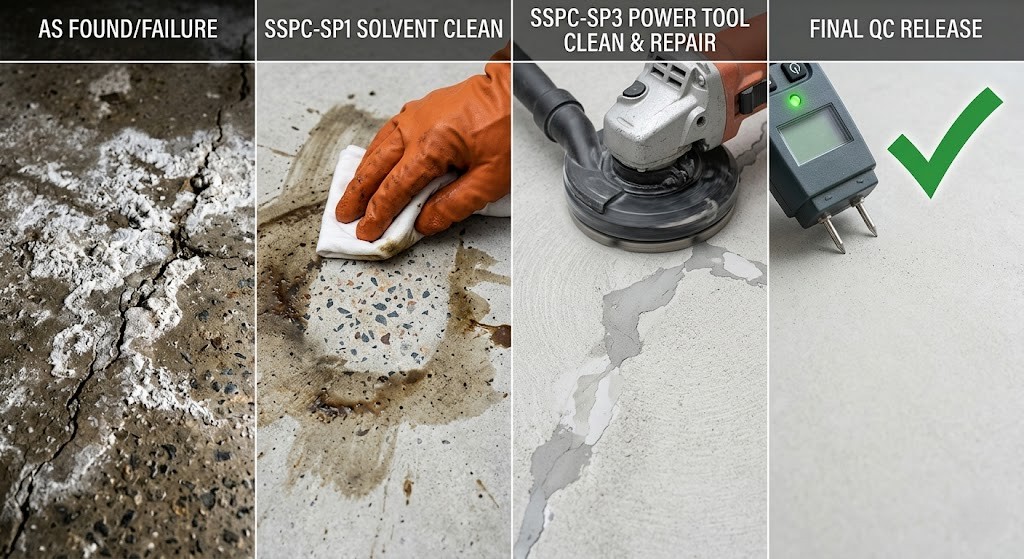
The standard procedure for surface preparation construction includes the following steps:
-
Solvent Cleaning (SSPC-SP1): Apply approved solvents to eradicate all visible oil, grease, and chemical contaminants from the substrate.
-
Mechanical Cleaning (SSPC-SP2/SP3): Utilize hand or power tools to scrape and sand the surface, entirely removing concrete laitance, efflorescence (white salt deposits), and loose mill scale.
-
Moisture and Climate Verification: Ensure the concrete substrate moisture content is below manufacturer limits (typically <5%) and verify the 3°C dew point rule.
-
Defect Repair: Fill all structural cracks, blowholes, and gouges with an approved stucco or masonry patching compound.
-
Final Sanding and Dusting: Sand repaired areas to create mechanical “tooth” for the primer, then vacuum or tack-wipe the surface to remove all microscopic dust.
8. The Painting Application Procedure
Primer and Sealer Application
Apply the primer coat to seal the porous substrate and neutralize alkalinity. Once cured, sand lightly to provide a mechanical key for the intermediate coats.
Intermediate and Top-Coat Execution Strategies
Utilize skilled tradesmen to ensure uniform atomization with spray equipment or even distribution via rollers. Strictly observe the manufacturer’s overcoating window (recoat time) to ensure the layers fuse chemically without trapping solvents.
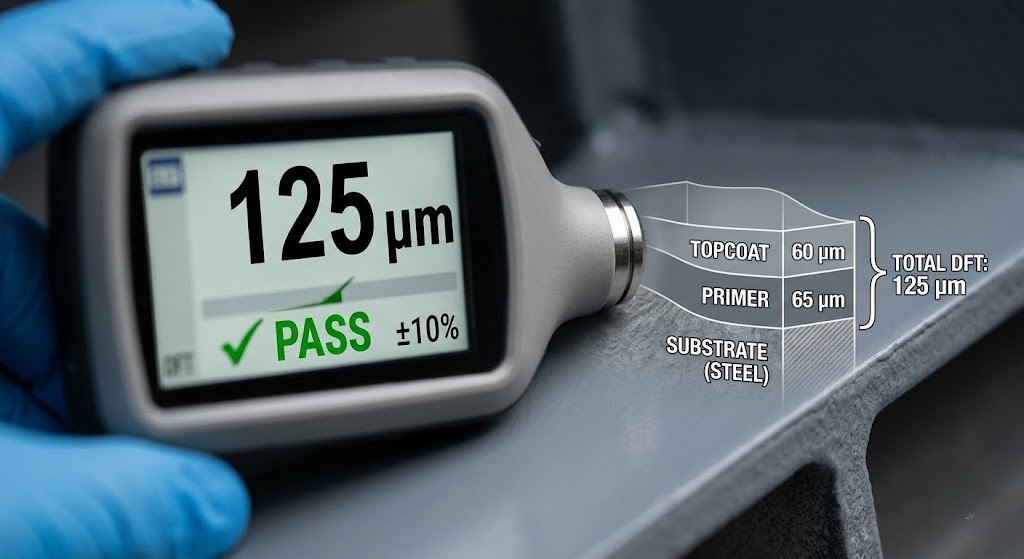
Verifying Required Dry Film Thickness (DFT) and WFT
Painters must use Wet Film Thickness (WFT) combs during application to gauge material volume. Post-cure, the QA/QC engineer uses a digital gauge to measure the Dry Film Thickness (DFT) in microns, ensuring the contractor is not under-applying the coating to save money.
9. Common Construction Painting Defects & Root Cause Analysis
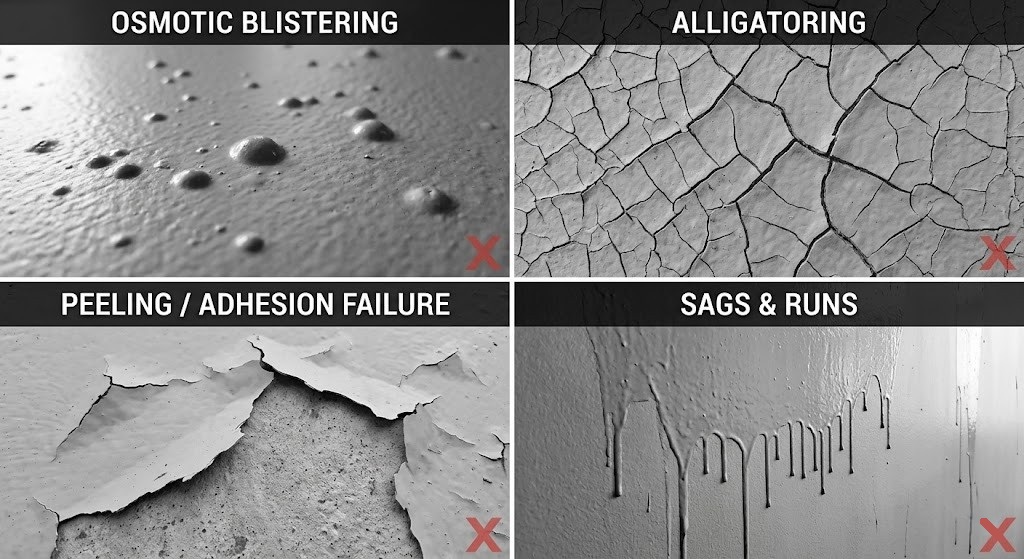
Common painting defects encountered on construction sites include:
-
Osmotic Blistering: Subsurface bubbles formed when water-soluble salts left on the substrate draw moisture through the semi-permeable paint film via osmosis.
-
Alligatoring: Deep, intersecting cracking resembling reptile skin, typically caused by applying rigid topcoats over uncured or highly flexible primers.
-
Feather Edge Lifting: Occurs when strong solvents in a newly applied topcoat penetrate and curl the edges of a sanded undercoat.
-
Solvent Pop: Tiny pinholes or blisters that happen when volatile solvents become trapped beneath a rapidly curing, “skinned-over” surface film (usually due to excessive heat or heavy application).
-
Orange Peel: A bumpy, dimpled surface texture caused by improper spray gun atomization, high paint viscosity, or rapid solvent evaporation before the paint can level.
10. Real-World Case Studies: Mitigating Expensive Mistakes
The Cost of Substrate Incompatibility: A commercial contractor applied an expensive epoxy topcoat directly over standard acrylic putty to accelerate the schedule. The strong solvents in the epoxy melted the acrylic putty. The entire system alligatoring within 48 hours, requiring a $15,000 mechanical grinding and complete rework. Lesson: Always verify cross-layer chemical compatibility.
Masking Failures and Adjacent Surface Damage:
Failing to properly mask aluminum window frames before spraying exterior polyurethane resulted in heavy overspray. Because PU cures incredibly hard, scraping it off scratched the anodized aluminum, requiring total window frame replacements. Lesson: Shielding and masking are as critical as the painting itself.
11. Comprehensive QA/QC Painting Procedure Checklist
Pre-Painting Hold Points:
-
[ ] MEP clearance formally signed off?
-
[ ] Mock-up approved for color and texture?
-
[ ] Substrate moisture tested and within limits?
-
[ ] Surface prep signed off against SSPC standards?
-
[ ] Climate metrics (RH <85%, Substrate +3°C above dew point) verified?
Execution & Post-Painting Verification:
-
[ ] SWMS reviewed and correct PPE utilized?
-
[ ] Paint batch numbers, expiry, and RAL codes verified?
-
[ ] WFT checked during application?
-
[ ] Minimum overcoating windows respected?
-
[ ] Final DFT measured and recorded in the QA/QC log?
12. Frequently Asked Questions (FAQ)
What is the ideal relative humidity for exterior painting?
The ideal relative humidity for painting is between 40% and 70%. You must strictly suspend painting operations if the relative humidity exceeds 85%, as it prevents proper curing and traps moisture.
How do I write a painting safe work method statement (SWMS)?
A painting SWMS must identify the specific High-Risk Construction Work (like working on scaffolds), outline the hazards (falls, VOC inhalation), and apply the hierarchy of controls (harnesses, ventilation, respirators) to mitigate those risks to an acceptable level.
What causes osmotic blistering in industrial coatings?
Osmotic blistering happens when the substrate is not properly cleaned of water-soluble salts or chemical contaminants prior to painting. These salts pull atmospheric moisture through the paint film, creating pressurized water blisters underneath the coating.
What is the difference between SSPC-SP2 and SSPC-SP3 surface preparation?
SSPC-SP2 refers to “Hand Tool Cleaning” (using wire brushes or scrapers) to remove loose rust and peeling paint. SSPC-SP3 refers to “Power Tool Cleaning” (using mechanical grinders or needle guns), which is faster and more aggressive but serves the same purpose of removing loose, non-adherent materials.
Why is measuring Dry Film Thickness (DFT) so important?
DFT dictates the lifespan and protective capability of the coating system. If the DFT is too thin, the substrate will corrode or degrade prematurely. If it is too thick, the paint can crack, sag, or fail to cure properly.
Be the first to comment